Our previous TTV Tutorial Articles show how you can create Template with Images. Now we would like to show you how you can create Template with Videos.
With our TTV (Template Test & Verification) platform, embedding videos in your Template is now applicable. So if you would be needing videos for your campaign, you can get the desired results through our TTV platform.
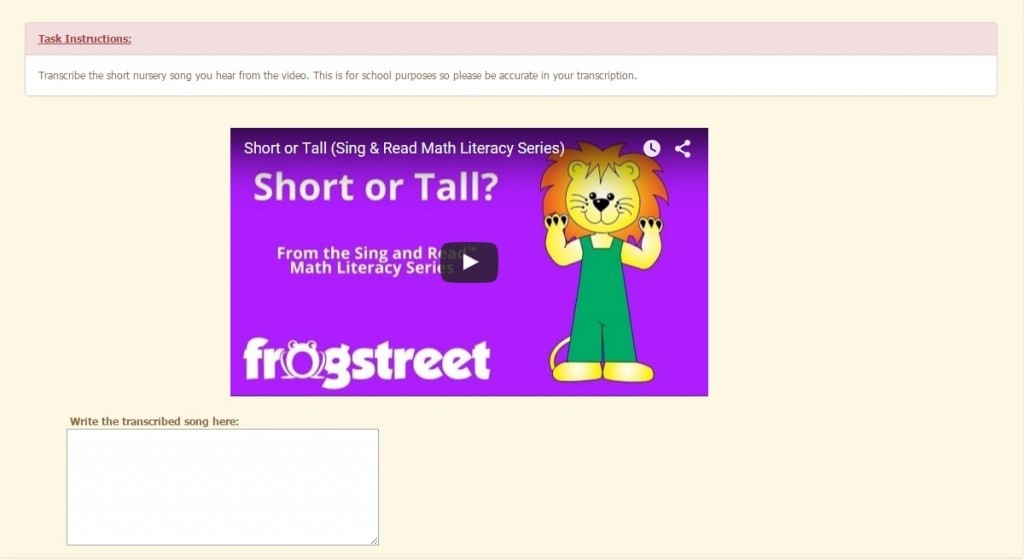
To easily show you how you can embed videos in your Template, we will take the “Transcribe A Short Nursery Song from a Video” campaign as an example.
To have an outlook of this example Template, please see image below:
Steps to follow:
1. Go to “My Templates” page and click the “Create a New Template” button.
2. Write down your campaign instructions and/or rules to guide Workers on how they should do your task. You can explore creating a more attractive text using the icons that you will see in the page. If you wish to use columns/panels for your campaign instructions, please refer to this Article on how to easily create/use such.
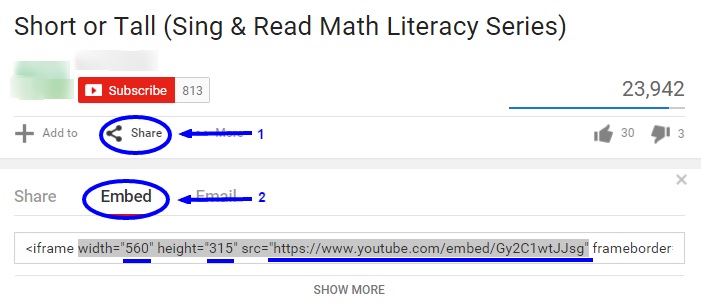
3. In embedding videos, you need to get the embed details found in the “Share” button from the link of your Youtube video. Click on the Embed link to show the Embed details. You will see the width and the height details as well as the link of the video, you will need these details to enter in the pop-up box in step 5.
4. Now, to embed your video, click the “Youtube icon” as shown in the image below:
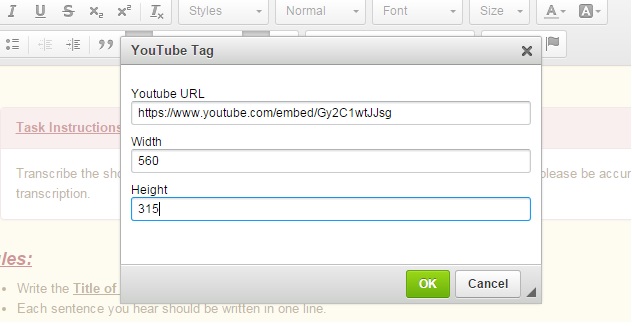
5. A pop-up box will appear. Enter the Embed Youtube URL, width as well as the height of your video. Follow step 3 for correct details.
Note: Please DO NOT enter the Youtube URL/link of the video from your browser. This will lead to an error when embedding the video. Please use the link you will see from the Embed details (step 3).
***Should you be needing a CSV file for your videos, you need to replace the URL, width and height to these variables: ${URL}, ${WIDTH},${HEIGHT} then CSV file should contain 3 columns: URL, WIDTH and HEIGHT
6. Click “OK” then you will be able to see a Yotube icon in your Template. You will only be able to see the actual video when you have clicked the “Update and Preview” button at the bottom.
7. Now scroll down to the bottom and click “Update and Preview”. Template preview will be shown to you. If you feel that you have something to add or delete, you can utilize the “Edit” button found at the top right side of the page. And you are done! You may now create a campaign using your created Template should you want to start.
Now, as you noticed, our example Template has a body background color. By default, Template’s body background color is white. But if you want your Template to look nicer by putting color in the body background, just like our example Template above, we insert some Bootstrap codes in the Source. See image below for better understanding:
As you can see from the image, you need to click the “Source” so we can insert our code/s to be used for our Template. You will notice that we have added this code/command: <div class=”panel panel-default”><div class=”panel-body bg-warning”> at the beginning of the source codes. Now for the color code, we have used “warning” for body background to appear beige in color (see Template example above). There are four more colors to choose from, please look at the image below as well as the color code names for your reference.
 This is how your Template will look like using those color name codes:
It is actually fun exploring the use of HTML codes in order for your Template to be presented nicer. You can navigate to these sites for the codes to use:
If you have any concerns or are having trouble in creating your Template, you can always reach us and we will get back to you at the soonest opp0rtunity.
You might also be interested in these TTV Tutorial Articles:
TTV-Tutorial: Template With Images
TTV-Tutorial: Transcribe Data From an Image


