Microworkers platform through its (TTV) extension is quite well optimized to meet web data collection demands easily and effectively.
In this (TTV) Tutorial we will focus on Data Extraction methods and guide you through the Template adaption for this particular purpose. For the guiding example we have created a correlative Template to help us extract the contact information from university websites.
Guide is mainly based on TTV’s Template Editor in Source Code 
Let’s see now how our Template looks like:
____________________________________________________
Template Preview: (requires Microworkers account login): Extract Contact Information
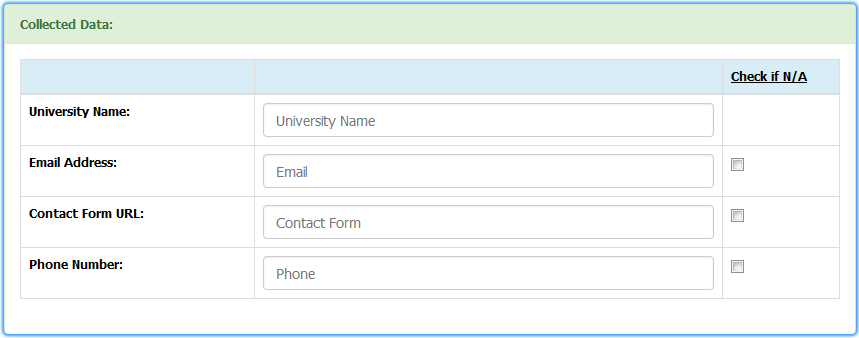
Screen-capture of live task (click image to enlarge): ![]()
____________________________________________________
- Task Instructions Panel
Standardly, we have listed main instructions inside Bootstrap Panels creating two sub-panels “Objectives” and “Attention” one besides another (“row” class) using Bootstrap’s Grid System.
<!-- Instructions -->

<div class="panel panel-primary">

<div class="panel-heading"><strong>Task Instructions:</strong></div>

<div class="panel-body">

<div class="row">

<!-- "Objectives" Panel -->

<div class="col-sm-6">

<div class="panel panel-info">

<div class="panel-heading"><strong>Objectives:</strong></div>

<div class="panel-body"><h5><strong>Help us to extract contact information from provided university website.</strong></h5>

<ul>

<li>Read <font color="#a94442"><strong>Attention</strong></font> box for the proper guidance</li>

</ul>

</div>

</div>

</div>

<!-- End "Objectives" Panel -->

<!-- "Attention" Panel -->

<div class="col-sm-6">

<div class="panel panel-danger">

<div class="panel-heading"><strong>Attention:</strong></div>

<div class="panel-body"><ul><li>Twitter, Facebook, LinkedIn and other social accounts don't count as valid</li>

<li><strong>Each</strong> checkbox must be checked if the specific information couldn't be found</li>

</ul>

</div>

</div>

</div>

<!-- End "Attention" Panel -->

</div>

</div>

</div>

<!-- End Instructions -->
(Coding Source: BS Panels, BS Grids, BS Typography)
- URLs (Universities) Source
Since we have a long list of universities for extracting the information from, we normally need a CSV callback to properly load them into a Template. With CSV approach each assignment will come up with different university URL/link for a User to work on. (Read more on Microworkers CSV approach).
Visual Editor: Click Here
Template doesn’t include a CSV file itself, an option for attaching a CSV will be given later, during the campaign setup
<!-- Csv -->

<div class="text-center">

<pre>

<strong>University Website:</strong>

<mark>

<a href="${university_url}" target="_blank">${university_url}</a>

</mark>

</pre>

</div>

<!-- End Csv -->
(Coding Source: BS Typography, URL/Link Attribute )
- Data Input
Now, after indicating instructions and URL variable on the Template, the next step is incorporating of data input fields. In order to accommodate visually good approach we pick out Bootstrap Table to place our Input forms into.
Visual Editor (“Text Field”): Click Here
Visual Editor (“Checkbox”): Click Here
When working with “Text Field” and “Checkbox” forms, it’s very important to adequately label the Name (“Text Field”) and Name + Value fields (“Checkbox”) to avoid any potential overlap among collected data — keep in mind that campaign results will come out under given labels (look for a CSV example at the bottom).
<!-- Collected Data -->

<div class="panel panel-success">

<div class="panel-heading"><strong>Collected Data:</strong></div>

<div class="panel-body">

<table class="table table-bordered">

<thead>

<tr class="info">

<td></td>

<td></td>

<td class="col-lg-1"><u><b>Check if N/A</b></u>

</td>

</tr>

</thead><tbody>
<tr>
<td class="col-lg-2"><b>University Name:</b></td>
<td class="col-lg-4">
<input class="form-control" name="university" placeholder="University Name" size="25" type="text" />
</td>
<td class="col-lg-1"></td>
</tr>
<!-- End University Name -->
<tr>
<td class="col-lg-2"><strong>Email Address:</strong></td>
<td class="col-lg-4">
<input class="form-control" name="email" placeholder="Email" size="25" type="email" />
</td>
<td class="col-lg-1">
<input name="no_email" type="checkbox" value="no_email_available" />
</td>
</tr>
<!-- End Email Address -->
<tr>
<td class="col-lg-2"><strong>Contact Form URL:</strong>
</td>
<td class="col-lg-4">
<input class="form-control" name="contact_form" placeholder="Contact Form" size="25" type="url" />
</td>
<td class="col-lg-1">
<input name="no_contact_form" type="checkbox" value="no_contact_form_available" />
</td>
</tr>
<!-- End Contact Form -->
<tr>
<td class="col-lg-2"><strong>Phone Number:</strong>
</td>
<td class="col-lg-4">
<input class="form-control" name="phone" placeholder="Phone" size="25" type="tel" />
</td>
<td class="col-lg-1">
<input name="no_phone" type="checkbox" value="no_phone_available" />
</td>
</tr>
<!-- End Phone Number -->
</table>
</div>
</div>
<!-- End Collected Data -->
(Coding Source: BS Tables, BS Grids, BS Panels, BS Form Inputs)
____________________________________________________

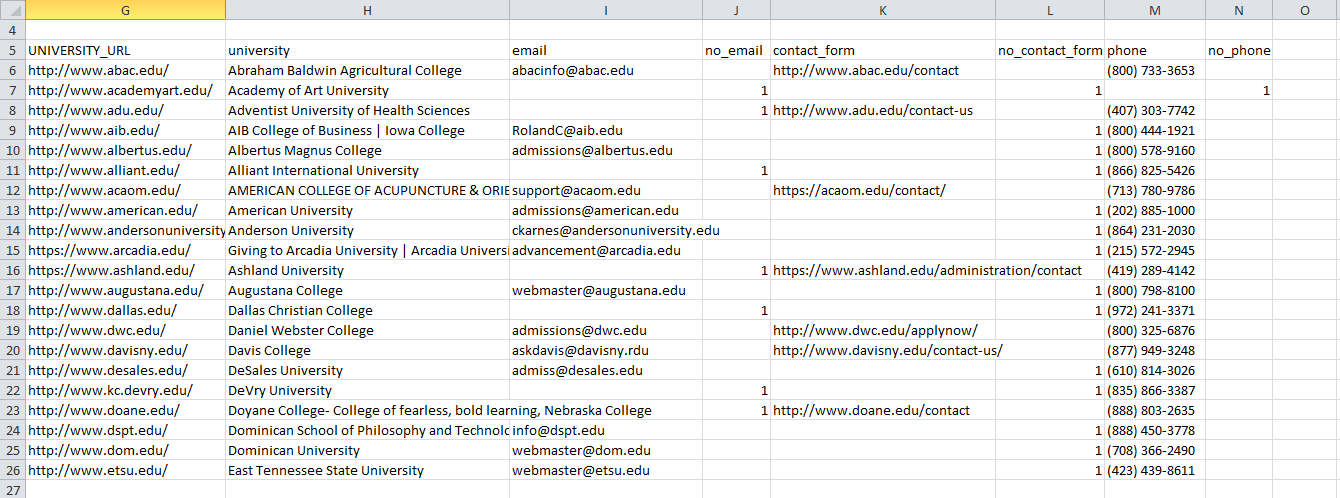
Example of CSV with results (click image to enlarge):

More (TTV) Tutorials are on the way… in the meantime you might try applying some of these codes we used above while making your own Template. For any help be always free to reach out to us. We will be happy to offer our assistance.
Till the next article stay up-to-date!
You might also be interested in these TTV Tutorial Articles:
TTV-Tutorial: Template With Images
TTV-Tutorial: Transcribe Data From an Image
TTV Tutorial: Embedding Videos In Template


